CV Joints
 www.econofix.com - Several "Rip-Off" Articles & Info
A bad axle will make a clicking sound when you turn around a corner, but will be fairly quiet when you're driving straight ahead. CV JOINTS on front wheel drive cars are expensive to replace. CV joints have rubber boots which keep the grease in and the dirt out. The boots should be replaced - and new grease put in the CV joint - every 50,000 miles. If you do this, the axles should last 150,000 plus miles with 50,000 mile lubes & boot replacements. (about every time you do the front brakes or tires.) In addition it's important to check the 4 rubber boots regularly, especiallly before a long trip. They'll destroy themselves fairly rapidly, they will start making a clicking noise on turns, and then you have to replace the axles! Rubber wears out with time and mileage. Something made of rubber that is over 10 years old is likely to be bad no matter how much it's used. THESE ARE THE BIG CAR KILLERS!
REFERENCE PRICE @ A REPAIR SHOP: CV REPLACEMENT: $125 TO $150 per axle. [ Economechanix, 6006 SE Hawthorne Rd, Gainesville, FL 32641-1620. 352-376-5624 ]
Checking
Your CV Joints
[From: /www.staugustinefwd.com/Diagnosis/Boots/boots.html ]
Check for damaged CV Joint Boots each time you change your oil! Look for torn or cracked boots. Cracks can occur due to age and simple wear and tear. IF you detect damage to the boot(s) you should have the driveaxle serviced. Proper servicing involves removing the driveaxle assembly from the vehicle and disassembly of the driveaxle to inspect individual component parts for wear and or damage. All the old grease is washed out and all the parts, like the bearings and cage and housing are examined. If everything is okay the boot is replaced (with fresh grease) and the shaft is reinstalled into the vehicle.
Please carefully look at the pictures below. See if yours need attention. Use your fingers to move and spread the boot bellows to fully inspect the surfaces. Remember, if the boot fails, grease will be lost and the driveaxle assembly will be at risk.
 |
NOTE CRACKS
IN THE BOOT |
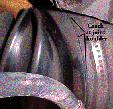 |
Check CV boots for any seepage, cracks, or tears. Any loss of lubrication will result in irreparable damage, leading to the replacement of the driveaxle with Rockford remanufactured driveaxle.
Check CV boots for type of material. Older rubber or neoprene boots allow contaminants inside even if there is no noticeable damage. Check for any type of dry-rot or stress-damage. Suction is caused in the inner boot any time the vehicle hits a bump, or hill, as the inner joints "plunge" to facilitate road contour. The outer boot experiences expansion every time the vehicle turns, due to heat build-up, then suction as the unit cools - stressing the boot. These natural actions will cause dirt and moisture to enter the boot through the weak spots. Once contaminated, the lubricant will break down. If the grease breaks down enough, the metal parts will actually start to rub, causing irreparable damage, leading to the replacement of the drive shaft. If caught early, replacement of the aged boot with a new DURABOOT will solve your problem.
Hard-plastic boots (for example: 1986 and up GM) allow contamination without noticeable damage, due to their nature of being hard to seal. These types of boots should be replaced with a new DURABOOT kit, and components inspected for damage. Any wear or contamination will indicate the need to replace the driveaxle with a Rockford remanufactured assembly.
Okay, you are looking to purchase at a new (to you), used vehicle. The rule of thumb: If the car has over 40,000 miles, it is time to anticipate CV joint boot replacement and repacking with fresh grease.
Most car owners agree that proper maintenance is the key to longer vehicle life and trouble-free service. Apply this idea to your front wheel driveaxle components, to receive the same benefits.
The CV joint transmits power (torque) to the wheels to move the car down the highway. The CV joint also allows the wheels to turn right or left, steering the car. The CV joints are lubricated with a special kind of grease which is kept in the joint by the boot, which serves as a seal to keep the special grease in, and dirt and water out. This grease begins to break down, losing its special protective abilities at around 40,000 miles.
It is very easy you to pull out the dipstick to examine the motor oil level, and to see how clean, or dirty, the oil is. If you see watery blackened oil on the dipstick, you would probably see your mechanic quickly for servicing. This idea is somewhat lost to most vehicle owners in relation to the CV joint. Most people don't even realize what CV joints are, let alone where they are on an automobile. We want to teach you the importance of CV joints, and the nature of their function, so you will realize the importance of proper maintenance in this area as well.
Once the car has over 40,000 miles on it, you can pretty well guarantee that the CV grease is breaking down, or is already useless in its job. The correct maintenance is to repack and reboot the CV joints with DURABOOT kits, and protect your investment in the vehicle.
A properly serviced CV joint can be expected to last the lifetime of the car. Another benefit is that maintenance performed now will save hundreds in repairs later.
From day one in the development of front wheel drive technology, the boot has been the weak link. As you might imagine, the search for improved boot materials by our industry has been almost non-stop from the beginning. First, rubber was tried and discarded because of problems with its poor resistance to CV greases. Then nitrile was tried and abandoned because of poor low temperature performance. Then came the rapid fire failures of neoprene, silicone, and finally polyurethane. Where do we go from here after so many misleading claims of superior performance?
Well, fortunately for the driveline industry, a very smart group of polymer chemists have finally cracked the materials barrier. At long last, a thermoplastic material has entered the picture! A material which demonstrates high and low temperature characteristics, is impervious to lubricants and is still flexible enough to make and hold a seal at even the most extreme angles.
Using this new thermoplastic material with all of the qualities we were looking for, the DURABOOT is still running circles around the competition in our laboratory tests. (see chart A & B, below.)
We designed the tooling so the new boot would have the proper flexibility, a suflicient wall thickness to provide strength and a proper seal at both the joint and the shaft. Duraboots have extra thickness where it is needed most... at the curves of the bellows and at the sealing areas.
Confirmed by testing and extensive research, we are setting a new standard for the industry...The DURABOOT from Rockford Constant Velocity!
REPLACING
CV JOINTS
[ www.users.bigpond.com/jack_stands/automotive_advice/CV_uni_joint/cv_joint.html - NOTE: No punctuation in original; great labor has been expended to render this semi-readable ;-( ]
A worn CV joint usually produces a clicking noise from the wheel area on hard turns.
To replace most C.V. joints you will need to remove the drive shaft and hold it in a bench vice at the shaft. On some outers you can remove the joint without removing shaft from the box, but you need to decide what you are replacing first; and are the other boots cracked or perished? If so, you may be better off getting a change over shaft: They are not too expensive, and saving by installing them yourself is a considerable saving.
If you wish to do them yourself, OK then, I will explain how.
 |
 |
 |
Firstly you need to remove them what ever the case, and you will need to undo the outer shaft nut at the wheel before you raise the car, and use a hammer and centre punch to lift the stamping at the end of the shaft, if it is a stamped type not a split pin type. Don't undo the nuts and shear the stake nut ends off. Use the punch, unless you intend to replace them, which may be necessary if you run out of luck. Swap left to right and you may get some new meat on the nut end to stake when you are finished. Then back off the wheel nuts a turn.
Once the axle centre nuts are backed off, use a block of wood and give the ends of the drive shafts a belt with a hammer, using the wood in between so you don't damage the threaded shaft ends. Then jack up the car and put it on Jack Stands so its Safe. Then remove the wheels. Once off, you will have to check out your setup to remove them. On some cars, the strut is part of the bearing and outer joint support; if so, it can be disconnected from the bottom control arm or ball joint.
You can swing it out enough to get the joint from out of the rear of it, then you can slip the shaft out of the transmission. If you can't get the strut to swing out, you might need to steer the car so the steering link is fully extended or remove it.
On some others the shaft runs in the centre of a wishbone lower strut support. With these, the same above applies but there is a draw bolt through the bottom arm once; remove, pull the power arm down; you may nee a long pry bar if the sway bar is stiff or remove one end of it.
On some, you may need to slip the brake calliper off to get enough distance if the strut makes it inaccessible or difficult remove the strut top or undo the top mount some.
When the shaft is clear, you can withdraw it from the transmission on some cars such as Subaru; there is a roll pin that is at the inboard joint and you will need a pin punch to knock it out before you do; mark the top as the spline only goes on one way and if its not right on refitting you won't get the roll pin through the hole as it is misaligned; this joint is a female spline and the box has stubs. Most inboard joints are male and slide into the diff of the transmission; due to this they are also the inner oil seal journal. You will need a drain tray or drain the transmission. This joint has a clip on the end inside that is in a groove at the end of the transmission spline it will compress as you withdraw the shaft, you will see it on the end when the shaft is out, sometimes the clip is sticky or binds so you need to pull the shaft out fairly sharply from the transmission.
If the inner type is a trunnion type you can tell by the tree slides in the outer housing that locates the trunnion legs; if it is this type undo the large boot and remove the inner; it will simply pull out with the whole shaft; watch the rollers don't fall off the ends of the trunnion pins. Otherwise it will be as below. [Illustration]
I usually push it all the way in first and then yank it out; if not, repeat it with a bit mort grunt; do not unless all fails use leverage at the joint to box and if you do, don't lever the towards the seal or you will damage it when the shaft pops out.
If the shaft is released as you withdraw it, support the end, when it comes out the shaft may drop and the shaft end clip can snag and tear the inboard oil seal lip; if in doubt replace the seals when the joints are out, they are very easy at that point, but will not be when it's all back together.
Once the shafts are out, clamp one in the bench vice at the shaft centrally or if you have the outer end exposed ready for replacement on the car, next is to remove the boot clips; if you have new ones and they are just plastic use the originals if possible; they are the best, or try to get some steel boot clamps; to remove, most stick a thin flat screwdriver up the centre of the clip and give it a tap; it will unthread it; if it is stamped, you will need to use side cutters to cut it.
With the boots undone and pushed back out of the way, you will remove the joint off the shaft first use some newspaper to wipe off excess grease so it doesn't splatter; then get a brass or soft metal drift, even some hard wood is ok to belt; and don't forget safety glasses. What you need to check is the type of method used to secure the joint to the shaft; some cars like certain Honda's have a C-clip or bolt on the end; you will have to angle the joint and remove the balls as described below enough to get the clip off; if that is the case, it sometimes is not possible without a big wrestle and I get a whole shaft from a ch/over service to save the messing around; the joints are not to hard to damage however most are like the transmission shaft clip, and compress as the shaft is tapped off. To remove the joint in this case, move the joint to an acute angle and clean off the centre boss on the shaft, this is where you will knock the joint off; do not hit the outer casing or the cage AT ALL; if you do, throw the whole joint in the bin it is %$#%$# as a hit on the outer will foul the cage and damage the balls and running surfaces and a hit on the cage will crack it.
So only hit the centre and use a soft drift always, not the hammer directly, you will chip the hardening off the centre boss; check it first and see if the boss slides on the spline shaft a small amount; if so it should come off OK; just rotate the shaft and angle the joint in a few different positions to get access to all around the boss at one side then the other; it should pop off like the drive shaft out of transmission and you will have the shaft and clip in its groove left, and the joint, cage, boss, and balls in your hand, and no jokes please. At this point if you have a new joint in front of you to fit and you have decided that is what's going to happen. drop what you have in the bin and get the new one out of the box.
If you wish to repack the joint then it will need washing out properly; first to do this you can dismantle the joint by pushing the boss in the centre to such an angle it exposes a ball at the cage; you can pick the ball out and repeat until all balls are removed then wash out the joint; the boss and cage remove fairly easy from the joint without the balls, but don't invert the cage or boss when refitting them; be careful as you can't mark them so lay them out on a rag as you wash them off part by part.
You will have to inspect its bearing surfaces; they are the spots on the curves that the balls inside run in; check for pitting on the surface and on the balls; also any cage damage; if all OK then you need to repack it with molybdenum disulphide grease; this is the grey stuff not to be confused with paste like graphite grease; you can use lithium grease also so long as it's a good extreme pressure high temp grease with high tack qualities.
To reassemble, use a bit of grease on each part then do the reverse of above until all the balls are in and the boss is facing straight out ready to fit; then you only need to pack it with grease.
You need to replace any boots that are cracked or perished and if that is the case, Use a large hand full and push it into the joint working out all the air then some into the boot; don't forget to put the small boot clip on first then the boot with a goop of grease in it then fit the joint to the shaft spline, use a new shaft snap ring; most boot kits come with a clip, clamps, boot and grease.
When you fit the joint make sure the snap ring does not get snagged out of the groove as the joint slides over it; then tap or push the joint on all the way and give it a yank back off to make sure the clip has locked in at the back; if not, the joint isn't on all the way. Once it is you will see the remainder of grease forced out; then wipe it around the shaft and fit the boot and clips, make sure you leave the clip tails bent away from the direction of rotation so they don't snag and get flipped up. And don't forget to fill the transmission after the shafts are in; if unsure consult the manual, but most front wheel drives fill through the speedo drive hole or a dipstick tube some others have a side plug.
Pay close attention to clips, shaft direction and which joint you are going to remove. When doing boots only I remove the inner joint on some as they are often more accessible to remove, then remove both boots off one end and wash the lot out, then repack the outer end, shaft still fitted, and replace the boot, then the inner boot and repacked inner joint.
On inners you can withdraw the inner joint from the inboard C.V. assembly by only removing the large boot clip the outer end keeps the shaft in; on this type sometimes there is a clip inside the outer joint; if so remove it. This joint differs a little; also as it is not like the outer joint with balls; on this there is a three peg universal joint with curve rollers on the ends that have needle rollers; be careful when removing the joint as the rollers can drop off and you will loose needle rollers; you will also find this set up with a trunnion joint on two piece front wheel drive shaft on the long side.
The inner joint must compress and extend with suspension travel as the shaft gets longer and shorter so it has a different operating characteristic as the inner but the are the same in relation to service other than the extra wear shown at the outers and both are C.V. so there is no shaft velocity change.
On some cars if a trunnion early cross type is used on a shaft singularly a rubber doughnut ring joint is used on the other to soak the velocity pulsation; you may find this in a Peugot tail shaft or in Mini minor front drive shafts there are plenty around but not worth any more detail than that.
And last thing after you have finished fitting shafts and wheels are on the ground you need to tighten the axle centre nuts very tight with an extension bar and a tube or stand on the bar; you will feel it clamp up tight, if in doubt use a tension wrench and get the specs but you may find it exceeds the range of the average tension wrench, then refit a new split pin or stake the nut in the shaft slot.